Saturday, February 23, 2013

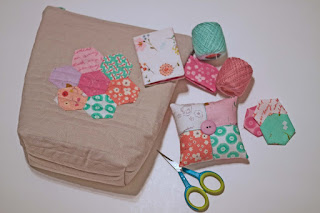
Spring Sewing Kit - Posy

I've been hexie-addicted recently (maybe I should say "readdicted" since this isn't my first ride in the hexie rodeo). You see, I have to have one upstairs and one downstairs project going at all times. The one upstairs is for the machine and is used to fill any unspecified sewing time...you know, the times when there's nothing pressing that has to get out the door yesterday. The one for downstairs has to be a hand-sewing project. It's what I do when my husband is watching tv after the girls are in bed. At this time of year I prefer to do a little (or a lot) of hand-quilting. Unfortunately, I spent a couple of weeks spinning my wheels trying to get something ready for hand quilting, but I just couldn't get anything that would take more than one evening ready to go between all the other things that were on my table.
 
 
So, I was digging around in the notions closet looking for something, and I accidentally knocked off my basket of charm packs and squares. Of course, eveything tumbled out all over the floor. I spent a good twenty minutes sifting through (and petting) all the I Spy charms and various thing I had collected over the last few years, when I saw them...a massive stack of 2.5" squares that I had acquired in a swap about a year and a half ago. I had stuck them in with the larger charms and completely forgotten about them!

 
Five minutes of printing and 3 sheets of cardstock later, I was set with a hand-stitching project that had to last more than a single night. And it might have...if I hadn't also been in need of a hand-stitching project for the carpool line. That one has to be something small that fits easily in my front seat while we sit waiting to pick up Belle every afternoon. But...between tv time and carpool time, I made pretty short work of the charm stack.

 
So, I raided the charm basket again, this time looking for 5" charms that could be chopped in fourths and would make lovely hexies. That's when I found two Posy charm packs and began to have visions of Easter table runners filling my head. I pulled one of the packs out and starting whacking away (ok - more like rotary slicing away, but whacking sounded more exciting).

 
42 x 4...168. 168 hexies Posy hexies added at least another couple of days to my hand-stitching project that I thought would go on for weeks.

 
And yes, a table runner and possibly even a wall hanging are in the plans using both the hexies and the remaining charm pack. But, 168 is a whole lot of hexies. And even after laying out the table runner and wall hanging I still had quite a few hexies and 5" squares left over. It seemed a shame to let them linger in the basket, so a couple of them found a new home in a spring sewing set. As I have no ACTUAL need for a sewing set at this moment in time, I popped it up in the shop. But, it's kind of one of those things that you know you need to let go of, but it turned out so well that you just really don't want to...you have those kinds of projects too, right???

 
She's just so springy and pretty...maybe she'll bring someone else a little smile this spring and then I can feel better about letting her go:)

Thursday, February 21, 2013

A Little Bit 'O Drama and Nifty Solution

 
A few weeks ago Rachel, at Stitched in Color, put out a scrap challenge. Readers were asked to submit project ideas for this beautiful fat eighth scrap bundle provided by The Intrepid Thread. Four challengers were going to be selected to receive the bundle and get sewing. The rules: You must use all of the fabrics in the bundle. You could add one additional fabric. You must complete the project and share your results by February 24.
 
 
So...I shared a bit of our drama. (Do you know how difficult it is to take a good picture of your backseat?????) I do believe my story went a little like this... "So...here's the situation...my two bambinas (3&5yrs) are crazy avid readers and books have completely taken over my tiny backseat. I keep saying that I'm gonna make them one of those snazzy hanging book pouch thingies, but I just never seem to get around to it. I need a deadline...I must have a deadline (and a little fabric wouldn't hurt) or we're all going to be eaten alive by Junie B and Dora! Only you can save us from the mutant book mob!" Cuz...drama always works for the littles, why not try it myself?

 
Luckily, Rachel took pity on me...and my backseat. My lovely little bundle of yumminess arrived from The Intrepid Thread in about 2.2 seconds and I started cutting right away.
 
I'm a quilter at heart, so I tackled this project like any good little quilter would...I made mini quilts....4 of them. I measured the space in my backseat and started with one large solid mini quilt as the back piece (that's Kona charcoal as my additional fabric). Then I drew out a little diagram to figure out the size of my three pocket minis [My measurements: total dimensions 12"x22". Mini quilts are 9", 14", and 19" in height x 12" in width.] and dreamed up cutie little designs for each. You only see a couple of inches of the two middle pockets so they are only pieced along the top edge. I made sure to save a nice large hunk of the Lillybelle bouquet for front and center. I added a layer of heavy weight interfacing to the back of each quilt top, then made a sandwich with each of the pieced tops, a layer of batting, and a solid piece of charcoal for the back of each. I quilted each mini and bound the top edge of the three pockets.
 
Then came the real fun...I stacked those bad boys on top of each other and bound the whole enchilada like a quilt (if you try this home, be sure to cut your binding strips wider than normal so it will wrap around all those layers.). Just go slowly and have patience. My poor little machine was so not happy with me along that bottom edge, but she persevered:)
 
The final step was creating a strap...again, I measured my space and found that I needed a 48" strap to wrap around my headrests. I cut two 6" wide strips of charcoal, stitched them together on the short ends, trimmed the strip to 49" and folded/pressed my long strip like really big binding. I added velcro strips at the ends and sewed all the edges of the strap together. The strap was centered on the top edge of the backside of the book organizer and stitched in place. (The velcro ends were sticking out on either side, so they can wrap around the headrests and meet in the middle behind the seats.
 
One little tip (wish I'd thought of it sooner and saved myself some trouble)...that back pocket is REALLY deep. You might want to stich it closed part way down so that books don't fall into the black hole. You should really do that before you bind all the pieces together...I kinda didn't think that step through, so I had to go back and hand stitch it closed...oh well, no one can see it:)

 
My little bit of drama turned into a pretty mifty solution. If you're interested in making one of these yourself, I'm sure there's a tutorial or a pattern out there somewhere...but like in my cooking, I just don't like to follow a recipe:)
 
THANKS, THANKS, THANKS to Rachel at Stitched in Color and Julie at The Intrepid Thread! We've finally gotten Junie B. and Dora to surrender and peace reigns again:)

Monday, February 18, 2013

A Sewing Space Spruce Up is Under Way!

Once upon a time a young couple created a nursery for their first born bairn. It was decorated in gender neutral crayon brights and featured adorable small-child-style accessories. Over the years this room was filled with snuggles and gurgles and tiny diaper changes. Then as time passed it underwent a slight metamorphosis...into a playroom, full of tiny toddler toys and the same small-child-style trappings.
 

But the family grew, and the children grew and it just didn't seem to get the use and love that it had once enjoyed. So, again, changes were made. A trampoline, some fairy dolls, and lots of art supplies were added. But the children didn't like to play alone, and the mother wanted to be able to create along side her budding little artists. So more changes were made. A sewing table, some shelves, and handy fabric storage made the space functional, but it lacked visual appeal for school-aged children and a 30-something mom.


And so a spruce up began. It started with some small accessories, and expanded with fresh new wall art.


The little yellow room felt so lucky to have its family back.


And the family felt so lucky to have this special space where they could create together. They promised to continue to make that little yellow room a magical place where they would want to spend hours together over the years.


And they all lived happily ever after...THE END!

Wednesday, February 13, 2013

And.......................DONE!

Sixty-seven years in the making...ok, maybe not that long! But, Belle's quilt is finally finished. Can I say that again??? FINISHED! Never again will I attempt anything even remotely on this scale...way too much of everything! But, it's gorgeous, and she loves it.


This one is all hand-quilted because I didn't trust myself enough to put it on the machine...even with a plain old walking foot. There was no way I was taking a chance on messing this thing up! A pretty rainbow in the border rounds out the outrageousness. I'm not usually a border-adder, but due to the nature of the design, to make it any wider I would have had to make it LOTS wider and then it would have been too wide. A border was my only real option. And in this case, I think the linen helps tone down the riot of color.


And, did I mention that it's FINISHED????

Sunday, February 10, 2013

More Hearts and some FMQ

In any other world, this would be a Valentine's decoration...not in Belle's world! Red, pink, purple, hearts, flowers...yep, that's an everyday kind of display:)
 

This is my favorite little detail. There's another little 4 patch heart hiding above the embroidery too. It was a fun little mystery for Belle to find the hiding hearts.


I can't believe I am even showing you this picture...this was my very first attempt at free motion quilting...yep, I'm a chicken:) I practiced a few swirls on a test sandwich...just enough to know that I wouldn't be stippling any time soon...the let her rip. There are some definite problem areas, but all in all, not too shabby. Fast is definitely better with FMQ...and that suits me just fine:)


Monday, February 4, 2013

Hearty Mats

For some reason, I'm feeling the need to decorate for Valentines Day this year. I think it's the absence of all the sparkly Christmas decoration. It sure isn't the cold, dreary weather...it's 70 degrees here while I'm typing!
 

These placemats came together relatively quickly...then they sat waiting for the binding to be stitched. It's a rather boring project and I've too many other ideas floating through my head to have any patience (or self-control).


But one was lucky enough to get its binding and have its picture taken:)


I love the little 4 patch heart on the front side, but how realistic is a white placemat? I mean...I have two children and we eat a lot of spaghetti!


So a quick, string-pieced back hides the spots and shows off the fabrics. Perfect solution...just flip that bad boy over before they eat.


And red and pink is just a delicious combo...don'cha think?