Wednesday, June 2, 2010

Rain, rain, go away...or on second thought


It's raining...again! My grass is sighing in watery bliss. My three year old...not so much!

We're headed to the beach tomorrow, so we were out picking up a few last minute things before the storms rolled in this afternoon. More on fun "projects" to do at the beach when we get back... but I knew from the rumbles of thunder and dark clouds on the horizon that we were going to be in for a long afternoon. So, as we were scouring the aisles for beach craft necessities, I decided to grab a new art supply to help entertain Belle while I worked on my LONG to do list.

I've been visiting the oil pastels at our local "projects store," for several weeks now, but the prices seemed a little hefty for a 3 year old's art box. So, today when I saw that Crayola now has oil pastels (28 colors for less than $6), I tossed a pack in the cart. I wasn't certain that they were going to be the same quality as the more expensive ones, but she is three after all.

Once we were home, Bee was tucked cozily into her crib for a nap, and the thunder was rolling we opened up the new medium. I brought out some watercolor paper because I thought the texture would make a nice combo with the new pastels, and off we went. Belle is really into drawing things that she can make out of basic shapes, so to start off I showed her some different ways to make flowers. [She's turning into a bit of a perfectionist, so I have to be careful or she ends up just wanting me to do it for her.] Since watercolor paper comes with its own fairly hefty price tag, we switched to colored construction paper after the first drawing. We went on the draw ocean animals {jellyfish, octopi, fish, and even a dolphin all from circles and lines). We practiced blending...Belle loves to blend because it's a great excuse to get the colors all over her fingers. Then we made some more flowers and letters for Daddy.

Most art supplies occupy Belle for 2-3 pieces of paper before she is bored and wants to move on. These lasted for 10 drawings! She just didn't want to stop. The colors are brilliant and go on super smoothly. The traditional "crayon" shape was familiar, but the results they produced were pretty fantastic. The set even has gold and silver! I would highly recommend these for the preschool crowd! We didn't even mind a little rain!

TEES!

I need to keep it short this evening...typing is a real challenge with bandaids on multiple fingers! I was more than a little clumsy at the machine tonight and stabbed several fingers with pins while I worked! But, I thought I would share a couple of quick tee refashions that I have done for Belle in the last couple of weeks. Both are reasonably simple if you are adept at working your sewing machine.

The first is this adorable bow tee. It was made to match the patchwork pants that I shared a while back. It doesn't take much explanation if you are familiar with ruffles. If you would like step-by-step directions, just let me know.

I created the bow by turning 2 long strips of fabric right sides together and stitching down the long sides. Next, I turned the tube right side out and top stitched both sides. Finally I cut the ends on the diagonal, turned the edges under and topstitched. Once the long strip was prepped, I tied the bow and hand-stitched it in place. I think next time I will attach the bow to a large pin so that it can be removed for washing. I was, of course, making this at the last minute the night before Belle's preschool program. And wouldn't you know that there were no appropriate pins in the house...oh well!

The ruffle was made by cutting a long strip of fabric approximately 4.5" wide by twice the length of the bottom edge of the tee. First, I sewed the short ends together to form a large circle. Then, I folded the circle in half the long way with wrong sides together and ran a gathering stitch (longest stitch length your machine will do) close to the edge. I pulled the top thread to gather the fabric, flipped it up over the tee right sides together and pinned it in place. I sewed the ruffle to the tee and finished the raw edge with a zigzag stitch. Finally, I flipped the ruffle down in place and topstitched along the edge of the tee approximately 1/8 of an inch above the seam. I really like the way this tee is long on Belle, but if you wanted the tee to hit right at the waist of your pants, then just cut a few inches off the bottom of the tee before you add the ruffle.

I don't have a pic of the second tee refashion, but it is really basic. I needed a tee to match a pair of capris that I made for Belle to wear to her birthday party (MY BABY IS 3...Where did the time go???). I couldn't find anything in her size that matched the pants, but I did find a tee one size too big. I figured I could make it work with some redesign.

My goal was to add ruching at the hip to shorten the tee and bring in the waist a bit. To achieve that I cut 4 pieces of ribbon (about 12 inches long) and 2 pieces of felt (about 6 inches long and wide enough to cover both ribbons plus seam allowances). On the inside of the tee at each hip, I placed 2 strips of ribbon side by side, one on each side of the side seam. I made sure that there was about 6 inches of ribbon hanging below the hemline of the tee. Then I placed a piece of felt over the ribbons (see diagram - it's rough, I know...but, I wanted to sketch something out so you could see the set-up). I started by sewing across the top of the felt and ribbons to hold everything in place. Then I sewed the felt to the tee on the outside edges and between the ribbons, making sure not to catch the ribbon in the seam. By scrunching the tee up and tieing the ribbons I ruched the side seams and shortened the tee by several inches...enough for it to fit Belle quite nicely. For a little added oomph, I used the same ribbon to hand-stitch a small bow on the top of each shoulder of the tee. I'm not entirely sure that I would use felt again because it added quite a bit of bulk (once again, it was a last minute improvisation). I think you could use extra wide bias tape or a piece of fabric (be sure you fold the edges under to prevent fraying). But, if felt is what you have...it will work just fine.

Diagram:
Dark line - bottom edge and side seam of tee
Dashed line - stitch lines
Shaded Area - ribbons
Rectangle with thin outline - felt piece

Thursday, May 27, 2010

It Takes Longer to Unmake Them...

Just ask me...because I know!

I have a rule that I never sew anything important when I'm tired. At 10:00 pm, my brain turns to mush. I can, and do, sew A LOT after 10, but only things for my own children and never anything on a deadline. So tonight when I sat down at 8pm to begin making Belle's birthday outfit for her party this weekend, I thought I was in the clear. Surely I could whip up a pair of ruffled capris and a refashioned tee in under 2 hours, and maybe still have time for a headband before I turned into a pumpkin. Right???

Well...let's just say there's now a second clause to that rule. Never sew anything important (or time-sensitive) when STRESSED! I guess I didn't mention earlier, that not only is Belle celebrating her 3rd birthday (where did the time go???) with a backyard full of preschoolers, but Bee is being baptized, and 3 far-flung families will be in town for the festivities. Oh...and did I forget to tell you that my MIL is getting married next week...at the beach...and I'm in charge of the rehearsal dinner and the flower girl?

There is more than one pesky detail bouncing off the walls of my over-taxed brain right now, but there I sat at 8pm, completely convinced that this project would go off without a hitch. Huh!

About 3/4 of the way into the capris, I realized that something just wasn't quite matching up. I've used this pattern many times with much success, but tonight it was wonky. The curves were out of sync, and the seams were making this funny pucker when I tried to force them together. Low and behold, I discovered that I had sewn the fronts upside down onto the backs. It just so happened that when I shortened the pattern to make capris, the inseam turned out to be exactly the same length as the crotch seam. I had flipped them without even knowing.

Now if I hadn't been using my favorite fabric...which just happens to be OOP, I probably would have junked the pants and started over. But I do love Darcy, and she is hard to find, and...well, I couldn't do it. I pulled out the seam ripper and set to work. And now, I can testify to the fact that it does take longer to UNMAKE a pair of pants than it does to MAKE them.

Oh, and that tee and headband...they went just about as well as the pants, but we're finally ready for Saturday (and I'm ready for bed!). I'll share pics of the entire outfit (and maybe a tee refashion tutorial) after the party...just don't look too closely, ok?

Sunday, May 23, 2010

Patchwork Pants


First of all, let me just say that I have a new favorite fabric store...Above All Fabric (www.aboveallfabric.com). This shop is amazing! The selection is out of this world, the prices are great (you should see some of the sales) and there is a rewards program that gives you money back toward your next order. Right now she is running a Go Pink sale that benefits Breast Cancer. Be sure to enter GOPINK at check-out. You get 10% off and another 10% is donated.

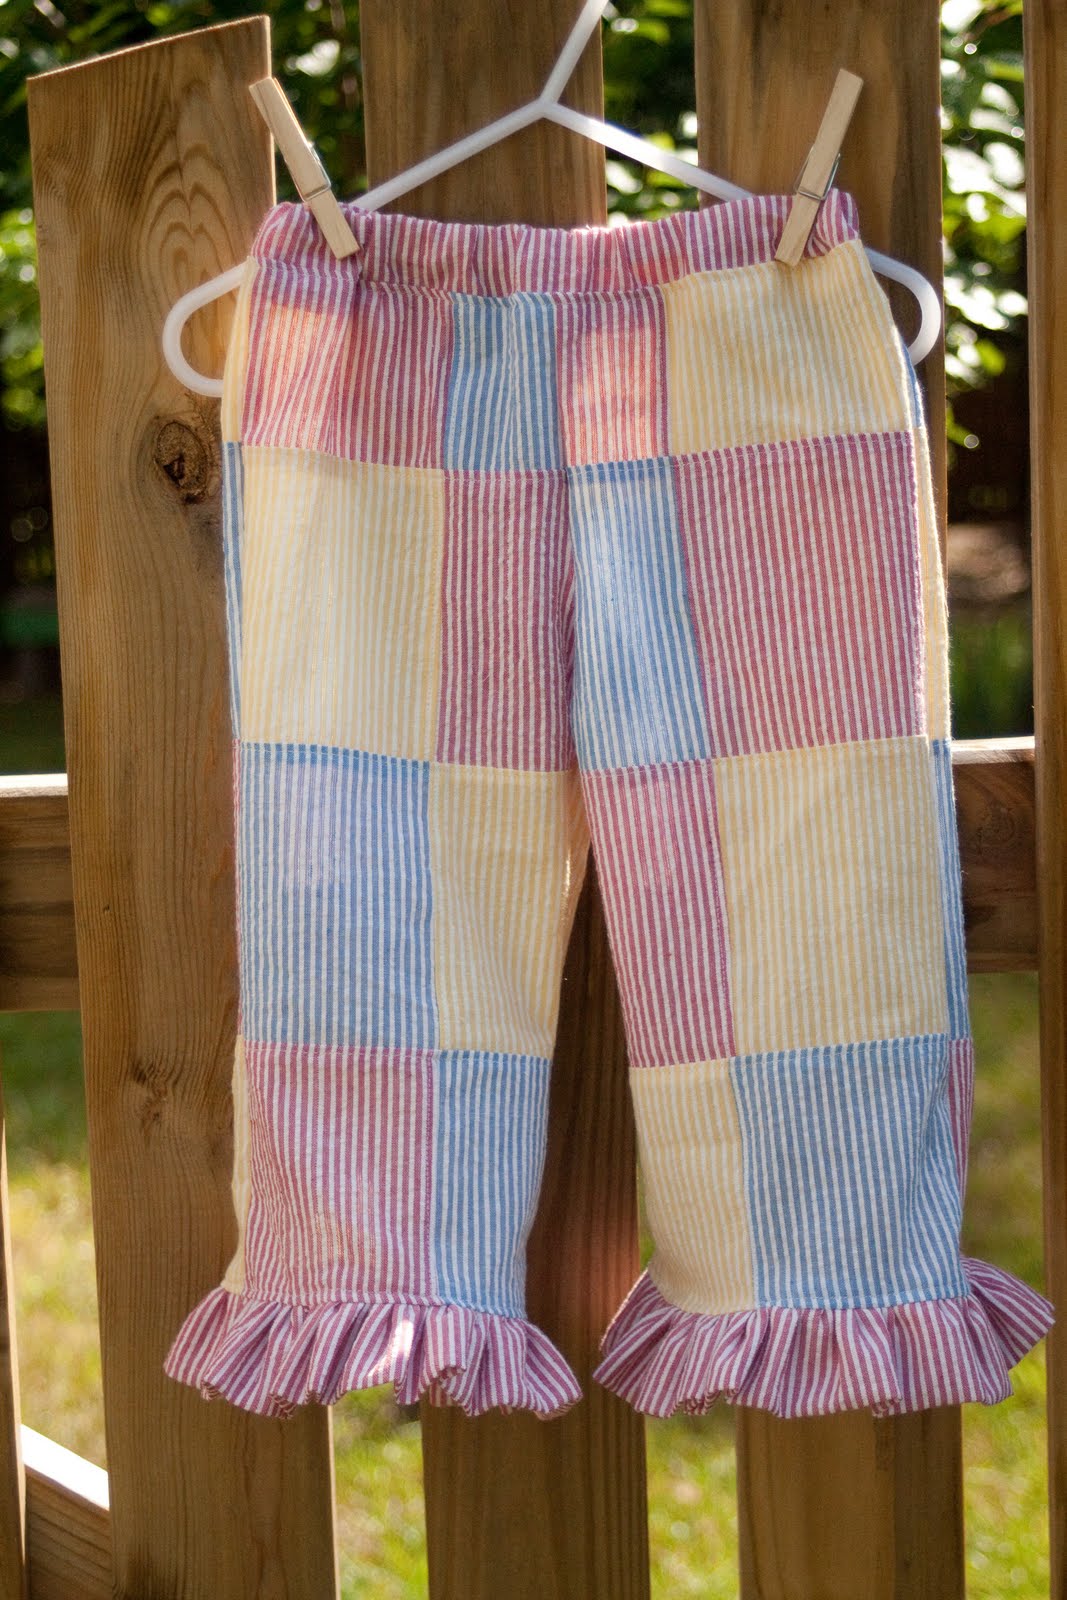
A couple of weeks ago I ordered the pattern for these amazingly cute little patchwork pants (see below) from Above All Fabric. As soon as it arrived, I broke out a charm pack that I had in my stash and put together the multi-colored pair for Belle (please excuse the wrinkles...I didn't think to take a pic before she had been wearing them all day, and after the day I've had, I am not about to iron them!). Of course, I had to order more fabric to finish them off...you didn't think I would complete an entire project just from my stash did you? After a successful trial run, I decided to incorporate these pants into my summer seeersucker stuff. Aren't they adorable?

Next to create a tee to match...I'm thinking white tee with red ruffle at the bottom and maybe a detachable fabric bow on the chest, but haven't quite decided. If you have any ideas, please share!

And, "the day I've had," for those of you who don't know me personally, involved my first triathlon...in a thunderstorm and mud almost up to my knees! But I finished...and with a much better time than I had anticipated:)

Friday, May 21, 2010

Mystery Quilt Buying Guide

Ok Mystery Quilters...here are your shopping instructions. If you have any questions don't hesitate to ask. I've built a little bit of excess in to the yardage for any little boo-boos that might happen. If you are a first timer, I do NOT recommend that you buy $10/yd fabric. A nice soft $4-$6/yd will do just fine.

You are going to need 2 colors (light and dark) for this quilt. The more the two fabrics contrast the better the final effect will be. I recommend that you purchase either solid color fabric or something with a very tiny print. We are going to be cutting everything into pretty small pieces, so if you have a large print you will lose it in the cutting. If you are new to purchasing quilting fabric...head to the big wall fabrics in your local fabric store. These are going to be the quilting fabrics.

You will need:
1.5 yards of dark fabric
2 yards of light fabric
2.5 yards of fabric for the backing and binding***

***Backing and Binding Fabric Note: You can use either of the two fabrics that you have selected (light or dark)....OR, if you're feeling adventurous you can select a print that matches your two fabrics. This would technically take you out of the realm of a "two-color quilt," but if you love it...who cares???

Other Necessities:
Sewing machine - don't have one??? You could still make this quilt, but you would need alternate directions...and a whole lot more time
Thread - I recommend Coats and Clark Hand Quilting thread - yes, I know we are machine quilting, but this is still my favorite thread because it doesn't tangle as easily. Get something that matches your light fabric.
Scissors - good fabric scissors will make your life easier
Ruler - a basic one will work, but see optional materials list for alternatives
Pins - I love the long ones with the yellow heads that come in a plastic box, but amy straight pins will do.

Optional Things That Will Make Your Life Easier:
Rotary Cutter - looks like a pizza cutter
3.5 inch square ruler - You can find these in the quilting section at the fabric shop, or you could use a larger one if you already own a bigger size (I'll probably be using my 6.5" square)
Rotary Cutting Mat

Some Color Combo Suggestions: DO NOT THINK YOU HAVE TO FOLLOW THESE. I just thought it might help to spark some ideas. Obviously, the easy answer is white/ivory with something else.

Red/Black
Light Blue/Navy
Light/Dark Pink
White/Black (very graphic)
Ivory/Navy (very traditional)
White/Orange (funky)
Red/Navy
Turquoise/Purple
Maize/Rust
Light Pink/Brown
Bright Pink/Navy
Light Blue/Red (nautical)
Turquoise/Black

When you've finished your shopping, come back and comment to tell us what you've picked...personally, I'm having a lot of trouble deciding!

Strawberry Goodness!


Strawberry season is just about over here, and I am hoping to get one more flat of my favorite berries before the fields close. If you're anything like me, you always pick more than you can eat, so here is a super simple and super delicious recipe for preserves. [And as I type this...Belle's face is pretty much covered in these very preserves...she's a big fan!]

Easy Strawberry Preserves
3 qts. berries, hulled and sliced (though I never actually hull them and they always turn out fine)
3/4 cup sugar
2 T. lemon juice

Combine all ingredients in a large pot. Cook over medium high heat until boiling, then reduce heat and simmer, stirring occassionally, for 45 minutes or until thickened.

The preserves will last 1 month in the refrigerator.

Enjoy...and you if make any, please share!

Thursday, May 20, 2010

Bee's Britches!!!


HAVE MERCY! Bee's Britches are the cutest thing I have ever seen!

I'm especially proud of these because I created the pattern myself. Bee has a pair of the sweetest little baggies that I put her in as soon as they come out of the dryer every time. I just love them, but since they came with a pretty hefty price tag, they are the only pair that I am willing to buy. When this Darcy fabric by Anna Griffin arrived in the mail a few days ago, I knew instantly what my first project would be.

I pulled Bee's baggies out (from the dirty laundry basket, of course) and began work on creating the pattern. It took me 3 prototype trials to get the proportion of the leg correct, but eventually I had a pair of scratchy, remnant-bin, blue seersucker baggies. As soon as the prototype was finished, I started cutting on the Darcy fabric. It took me two evenings to get them put together (and those pockets gave me a run for my money), but the result is PRECIOUS!

And, I've already cut out the next pair...