Saturday, April 30, 2011

Style Stitches - March

First, let me defend myself...these were almost finished on time! Just a few days late, I promise. They just didn't make it to the blog sooner because of all the other seasonal projects that I've been completing. PROMISE! So...a while back I told you that I was too nervous to tackle my third sewing goal for 2011. But not that I've partially conquered it, I think I can finally share. Sewing Goal #3: CLOSURES! I've been sewing for too many years to be nervous in the face of zippers and buttonholes. And to be completely honest, it's not the closures themselves that scare me...it's more the mechanics of the sewing machine. Something about needing special equipment just really turns me off. This goal is actually the entire reason I joined in the Style Stitches challenge. I needed something to force me to figure it all out. And I can honestly say...I have a new obsession! I am completely in love with colorful zippers. I've started collecting them on every trip to the fabric store. It's getting a little out of control. I've made a collection of these bags for myself and various people...and I'm having so much fun! And nary a white or black zipper in the bunch! For my first set, I actually just picked out the zipper color I wanted for my own bags. Then I came home and pulled fabric from my stash to go with the zippers...totally backwards, I know, but lots of fun that way. I finally settled on this bizarre palette of hot pink, chartreuse, and dove gray. It may be my new signature palette...I am THAT in love with it:)
So...now on to button holes!

Friday, April 29, 2011

Olivia

Olivia is a smart, sassy, and serious little bundle of knowledge. She can educate you on the classification of butterflies, enlighten you on the subject of color coordination, and broaden your understanding of the physics of a cartwheel. But, she won't hesitate to point out your misconceptions, so you had better be on your toes:)
Olivia can most often be found with her nose in a book, but she also spends considerable amounts of time studying the world around her. She carries a field journal with her on all of her adventures to keep a record of her discoveries.


I'm sure those of you who know me and my children personally, can probably see little bits of all of us in the characters I create...bet'cha can't guess who inspired this one:)

Tuesday, April 26, 2011

MMM Swap COMPLETED:)

SENT: 1 reversible mini-quilt, 2 zippie pouches, 1 needle book, 6 skeins perle cotton, 1 1/2 yards Modern Meadows, and a handful of needles to fill the book


RECEIVED: 1 needle book, 1 pack needles, a rainbow of 5 AMH zippie pouches, 1 pin cushion caddy, and a pile of AMH and Metro Living


I am one seriously lucky gal! Kelly spoiled me rotten:) Thanks so much for all my wonderful goodies! I sure hope my partner enjoys her little treasures as much as I am enjoying mine!

Sunday, April 24, 2011

Happy Easter!

One of my favorite hymns from my childhood begins with, "Up from the grave he arose..." I love Easter because it is a time of such renewal, and spring in NC is an amazing thing to witness. It is a glorious day here to celebrate the resurrection of our Savior.

And regardless of your spiritual leanings, I hope that you are enjoying this fine spring day.


We've had a visit from the big bunny, visited family, and hunted more eggs. Sadly, we missed church due to a couple of unseasonable colds and some nasty little coughs:(


But, we still looked springingly cute in our new dresses:)


And just in case you're wondering...


Belle's dress was made with this tutorial from Freshly Picked. I added an underskirt, a sash, and some pretty little pleats just for fun. I also cut a slit in the back and added a button closure...the size of the heads on my little angels would amaze you! This is the first time I've used this pattern and I am in love! Assuming you leave out all the little extras that make it Easter-special, I think this would come together in less than an hour. And the inside is fully finished with no raw edges, zigzag stitches, or serged seams. It is a very professional-looking finished product and so sweet on.


Bee's outfit made use of the Sweet Pocket Pinafore pattern by Heidi and Finn. I followed the pattern directions to a tee, except that I added ric rac around all the edges. Once again, the pattern, as it is written, comes together very quickly and results in a very professional-looking finished product. Adding the ric rac makes the process a little more tedious, but it was just too cute to pass up. The bloomers are made with the Scientific Seamstress Easy Fit Pants pattern. I made a pair at shorts length, then stitched in a piece of elastic about 3/4" from the hemline on each leg. I've definitely gotten my $9.95 out of this pattern. It comes together with only two pieces and six seams and fits a WIDE range of sizes. It's also available for teens and adults and I'm seriously considering grabbing that one too. I know I've used the kids version at least 15 times already and my kids won't outgrow it for many years:)


One note about Bee's pinafore...that's a size 2T on my very tiny 19 month old. I think the pattern runs pretty short over the tummy, so I would recommend that if you want to be able to wear it with just bloomers that you make a size larger than you normally would.


Both outfits, are made with fabrics from the Flower Sugar line by Lecien. I don't normally splurge on imported fabric, but for this occasion I just couldn't resist.


So, Happy Easter and I hope you have a wonderful day!

Friday, April 22, 2011

Spring Pinwheels - Completed

Spring Pinwheels is finally complete! And Belle is loving it:) All her babies now have a genuine quilt under which to snuggle. Thanks again to Chrissy and Linda at Sew Lux for hosting this quilt along!

Thursday, April 21, 2011

Randomness

My children play together really nicely. I'm lucky and I know it! I think back on all the times Belle nearly popped Bee's head right off her little body trying to hug her when she was still an infant, and I'm hoping that by letting them establish their own boundaries with each other I've in some way fostered their relationship. I'm realistic enough to know that's a bunch of baloney, but I sort of like my delusions:) They love to color together, kiss each other good night, and make family beds (big piles of pillows and blankets) to share in the family room.
And who is the first person Bee asks for when she gets up from her nap??? Belle (except that, for now, she calls her "Nee-Neet," a name we will never figure out!).


And as a mom, it really makes life easier when your children will entertain each other for extended periods of time. On rare occasions, you can almost...ALMOST, have a complete thought, all at once:)


And every so often you can get a little work done. Not often, and definitely not all at once. But over time, it can add up. A hem-band here, a waistband there, and every so often an applique or two.


Though I will admit, that sometimes I wish they wanted ME to play...but I guess that's the price I pay for having such an amazing pair of sisters in my house!

Monday, April 18, 2011

A Vintage??? Modern Bunny

After all the hullabaloo surrounding the Growing Your Baby feature, I thought it was high time to start making some things for and WITH my kiddos. Belle wanted a bunny oh-so-very-badly, so we pulled out the Modern Bunny pattern at naptime one day and got started. Of course, I let Belle pick out the fabric...and wouldn't you know, she picked a vintage pillowcase and a reproduction print. This one's a quirky one, that's for sure:) So we made a vintage modern bunny!
So, Flowery has taken up residence at the head of Belle's bed, along with the matryoshka we made a while back and the knit doll I gave to her when she was born (no - I didn't knit it!). This kiddo has never carried a particular doll or stuffed animal around with her, so being given a place in the bed is the highest honor.


Now to plan a bunny for Bee...hopefully in time for Easter!

Saturday, April 16, 2011

Spring Stitchings

A few peeks at the second embroidered Easter quilt. I used the two blocks that I decided to leave out of the first quilt. Then I sketched two new designs to complete the quilt. This one is a more traditional spring color palette. And a little more girly.


Looks like Lilac likes it!

Wednesday, April 13, 2011

Swashbuckling Pirates!

Another of "My First Friends." If you haven't met Penelope, hop on over to the shop to read her bio. She's one-of-a-kind! And yet another, embroidered doll quilt. I just LOVE this color combo...it makes me so happy!
Belle adores Penelope! I think her favorite part is the removable eye patch. It drives her crazy that she can't play with her! I guess that means I need to get busy on another pirate doll:)


Tuesday, April 12, 2011

New Friends - A Doll Swap

Make new friends, But keep the old, Some are silver And the other gold
Thanks so much to my new friend, Melissa! We are so in love with our new baby...though we can't seem to settle on a name. I'm hoping to get your doll in the mail tomorrow:)

Sunday, April 10, 2011

Modern Bunnies

Over the last several weeks you've seen a million and one of my dolls. I've developed a pattern which I'm calling "My First Friend," and with each doll I tweak the specifics a tiny bit. I think I'm finally happy with the dimensions, curves, etc. for the girl doll, but Timothy here is my first attempt at the boy adaptation. Thinner through the bum, pants, shirt sleeves... What do you think???
The doll is designed to be appropriate for kids of ALL ages. I think that having a "big" girl and all her "big" girl toys around a smaller child has made me think about the accessibility of toys. Small parts, removable pieces, long strings/ties...all hazards for a toddler, but all involved in just about every toy my 3 year old owns.


So I set out trying to design a doll that BOTH of my girls would love. It's large enough that an older child will be able to consider it a friend, but lacking in all the choking hazards normally found in dolls.


With My First Friend working really well (and selling really well locally), I decided that we needed some animal friends around here too. So....


I'd like to introduce you to my new friend...Modern Bunny!


The Modern Bunny pattern is actually designed to be the base for numerous animals just by exchanging arms, ears, noses, etc. And once again, I'm trying to make something suitable for all ages.


Fabric selection is or paramount importance for this pattern. A skull and crossbones fabric immediately toughens it up. A vintage floral makes it sweet and precious. A modern novelty makes for a fun playmate.


One day, we'll have Modern Kitty, Modern Puppy, Modern Elephant...and a host of others. But for today, I just really like these two. If you want to read the story of each of my new friends, you can find Lilac and Bennett in my shop (Timothy's there too!). Their bios are in the listings. They're pretty lively characters, but I'm afraid this post is already way too long:)

Friday, April 8, 2011

Show It Off - Quilt Pattern

This quilt is all about showing off! Whether you choose to show off a hand-stitched design or a large print on a beautiful fabric, you'll have this whipped up in a jiffy! The pattern below is really just intended to give quilters the dimensions of my pieces, so they can replicate if they so choose. But, I added more detail so those of you with sewing experience could play along. If you're a total quilt newbie and would like to see a Quilting 101 series, just leave a comment and let me know. I have one in the works, but it keeps getting pushed to the back burner. Having someone hold me accountable, might actually make it happen:) 
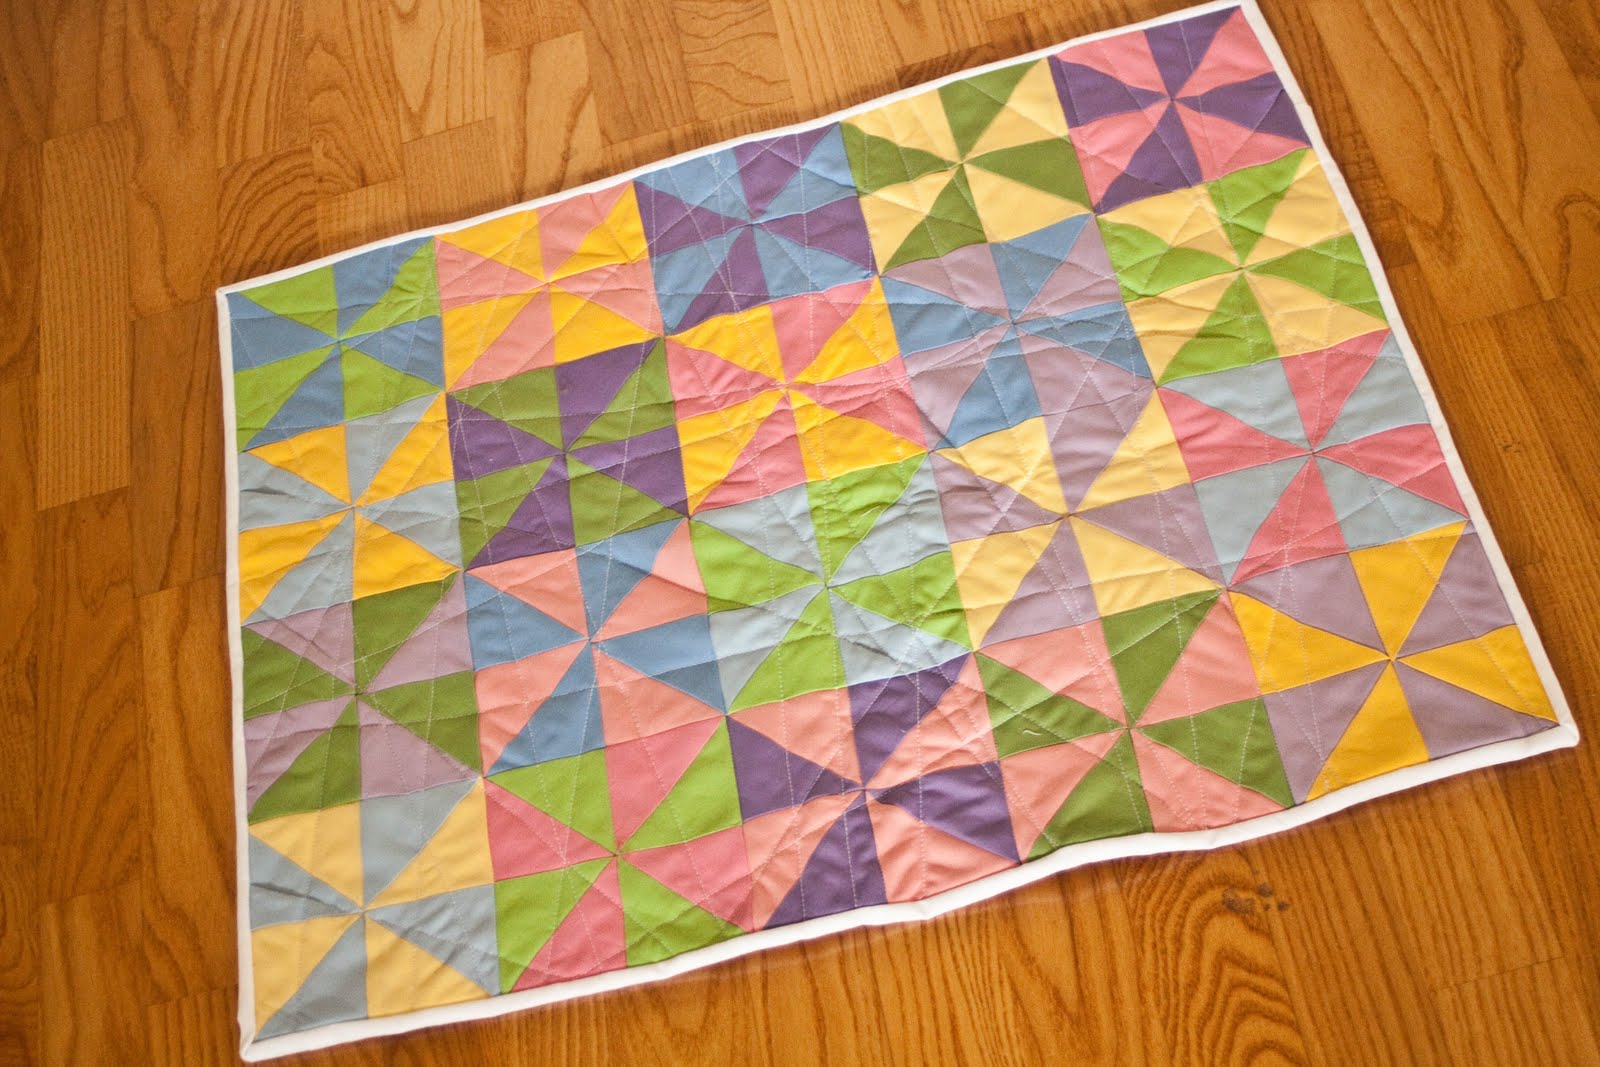
You'll need: 4 center pieces 8.5" square (something you want to show off) 4 coordinating fabrics perle cotton thread if you choose to do hand-quilting crib-size batting (or a 32" square of batting if you're like me and buy big batting and cut it up) 1.5 yards backing and binding fabric Note: All pieces are cut using a rotary cutter and square ruler. All pieces are joined by placing right sides together and sewing using a 1/4 inch seam allowance.

1. From each coordinating fabric: Cut 2 rectangles measuring 3.5"x8.5" and 2 rectangles measuring 3.5"x14.5". [And you experienced quilters can probably stop reading right here and run off to find something to show off:)]

2. Lay-out: Decide which coordinating fabric will accompany each center piece. Then decide on the block placement for the finished quilt.

3. Assemble Block: Attach the two smaller rectangles (coordinating fabric) to each side of the first center square. Press seams toward outside. Then attach longer rectangles to top and bottom of center panel. Press seams to outside. Repeat for next 3 blocks.

4. Assemble quilt top: Sew top pair of blocks together. Then sew bottom pair of blocks together. Press seams in opposite directions (ie. top seam to right and bottom seam to left) as this will make matching seams easier. Sew top row to bottom row matching the center seams. Press seam toward bottom of quilt.

5. Create Sandwich: Place quilt top on batting. Trim batting to approximately 2 inches wider than top on all 4 sides. Place top and batting on backing fabric. Trim backing to approximately 2 inches wider than batting on all 4 sides. Extra around edges allows for any slipping during quilting process and will be trimmed later. Baste well using your preferred method (pins, basting spray, etc.).

6. If machine quilting - Stitch 1/4" on each side of center square outline and 1/4" on either side of seams between 4 large blocks.

7. If hand-quilting - select perle cotton thread to complement block. I prefer to use variegated, but that's just my personal choice. Hand-stitch, keeping stitches as even as possible, 1/4" inside and outside center square. To stitch around the outside edge of each large block, you will need to stitch 1/4" from the 2 inside seams and 3/4" from the outside raw edges. This will accomodate your binding in the next step.

8. Prepare binding - Cut three 3 inch strips of backing fabric for binding. Sew short ends together to form one LONG, SKINNY piece of fabric. Fold strip in half lengthwise and press well.

9. Attach Binding - Place binding raw edges together with quilt top and sew using 1/2" seam allowance and mitering corners. If you don't know how to miter the corners of quilt binding and want to see some pics, just leave a comment and I'll get a quick tutorial together for you:) Fold to back, press well and hand-stitch folded edge to back of quilt.


Questions? No? GREAT! Now go get busy:):):)

Tuesday, April 5, 2011

FREE Embroidery Pattern

Well, you've clearly discovered that I have a temporary embroidery obsession. So I thought, as an early Easter present to all of you, I would share one of my embroidery patterns. Sadly, I can't share any pics of a finished design, because...well...it just isn't finished, and with the looks of my To Do list, it won't be any time soon. But, this pattern is ultra-flexible and can result in a trillion different things. In my version, each circle is a different color. But, you could just as easily make them all the same...or alternate colors...or rotate 3 colors...or do different shades of one color...I think you get the picture. It isn't a super fancy pattern...and not even hand-drawn, but it's one of those things that could go SO far awry in a hurry if you tried to draw it out by hand. Ask me how I know!! I hope you enjoy it...and if you try it out, I'd love to see pics of your finished products!

Monday, April 4, 2011

VERY Special Announcement and a GIVEAWAY!

I'm so excited to tell all of you that Belle + Bee was selected to be featured on the Growing Your Baby website today! And they're hosting a GIVEAWAY of one of my handmade bunnies! A while back I was contacted by the editor of the website and asked if I would like to be part of their month-long series on Etsy artists...um, yeah! So I've been working my little fingers to the bone to update the shop listings and get some new designs ready before the big day. I hope you'll hop on over to the feature, take a look around in the shop, and share your favorite item in my collection. Then I really hope one of you will win a handmade bunny from me:)

Sunday, April 3, 2011

Chasing Away the Rain...

Rainy days are always a challenge, but when they're COLD, rainy days it just isn't pretty! So we decided to try to chase away the rain. Out came the colorful tissue paper and up popped some new spring blooms. Belle has a thing about always needing a centerpiece on the kitchen table. We've had everything from a pair of scissors to my husband's hat thrown in the middle of the table just to satisfy her. I think these are a big improvement! And to kill some time while we were waiting for the sunshine to arrive, Belle designed her first tee. Look how proud she is!
I had her draw a picture on white paper with a dark marker. Then we traced the outline of the shapes on Lite-Bond fusing paper. She picked the colors of fabric she wanted and we got busy with the applique. I had to do all of the ironing and most of the stitching, but she sat with me and picked the thread colors and helped when she could.


And this little gal must be a sunshine fairy, because by the time she was finished the sun was shining brightly! Thank goodness!

Saturday, April 2, 2011

Pinwheel Quilt Along

So, a while back, I told you that one of my sewing goals for 2011 was to return to my quilting roots. I think I might have taken that one a little TOO seriously! Right now, I currently have 4 quilts in process that I hope to finish in the next few days. And I have finished two others in the last week. That's a whole lot of quilting! Now mind you...they are all doll or baby/crib size. Nothing large has been completed, though there are 3 of those in the works too! YIKES! Oh, and I just remembered a mini that's almost finished too, good grief! So when my new friends at Sew Lux Fabrics let me in on their little quilt along, of course, I jumped right in:) This one was a no brainer. I could whip it up in a jiffy and I could make use of some of my stash (the other sewing goal that I've revealed...there's one left that I refuse to admit because I'm just too scared to pursue it!). This little cutie is intended for my Belle. She's been a little jealous ever since Bee got a baby quilt for Christmas. Belle plays with her dolls every morning before the rest of the family gets up. She has the doll cradle that my grandfather made for me when I was little in her bedroom now. It already has a hand-knit blanket that her Aunt made her when she was born folded up in it as the mattress, but those poor dollies just look cold:) So it seemed right that she needed a new quilt for the cradle. We won't even mention how CRAZY she has been going since there have been so many dolls and doll quilts flying out the door for orders recently, while none were heading her way:)

This quilt has actually already been quilted and the binding is attached. It's just waiting for the binding to be completed. But, I don't have pictures of it since then, so just take my word for it...and I promise I'll show it to you when it is finished.


And just a note of thanks - My mom sent me the charm pack that I used for this quilt quite a while ago...so thanks, Mom! You've made Belle a very happy little girl yet again (and she thanks you doubly for her new movie!).

Friday, April 1, 2011

Easter Stitchings - Doll Quilt

I shared the sweet little spring stitchings that are the foundation of this quilt a little while ago. In all honesty, I embroidered the designs and then had no idea what I was going to do with them. Thankfully, Harriet caught my eye and I just knew she needed a new quilt.

I think she likes it:)


I trimmed the embroidered blocks to 8.5" and then added a simple border to each one. I really wanted the focus to remain on the stitchings and not the complementary fabrics and I think it worked out pretty well.


Then I started combining the blocks. I had originally planned to use all 6 stitched designs, but once I had these four together, it just felt complete, so I left the others for another project. And I really love this color combo...the pink and green on the other blocks somehow ruined the quirky palette.


The finished dimensions are perfect for Harriet or any of my other 19" dolls and bunnies. She likes to be swaddled up where it's warm and cozy:)


Once the top was finished, I just had to do some hand quilting with my DMC cotton perle! It is a great complement to the embroidered designs and really gives it a fun, vintage feel.


The quilt is already SOLD, but if you're interested in making one yourself, the embroidery patterns are available here. I'm so glad this little beauty found a home that will love her for many, many years!